Getting the Most from the T10 or T10+ Smart Thermostat
Prioritize Rooms
Prioritize a specific room or multiple rooms, or let comfort follow your move using built-in motion detection.
Control on the Go
Adjust your thermostat from anywhere using your tablet or smartphone.
Save Energy
With Auto Away/Geofencing, you can save money on the most expensive part of your energy bill while you’re away.
Simple Installation
The thermostat automatically programs itself. Just answer a few simple questions and you’ll be up and running in no time.
Whole-Home Range
With a 200-foot range, 20 sensors with temperature, humidity, and occupancy detection can connect to your thermostat from throughout your home.
Know Your Home Is Safe
Get customizable alerts on your mobile device when the basement is so cold a pipe could burst, or if the baby’s room is getting too hot.
Apple® HomeKit™ Setup
-
Touch Menu icon at the bottom of the T10 or T10+ home screen.

-
Scroll down and select Connect HomeKit.

-
Use the Apple Home App and select Add Accessory. Scan the code shown on your thermostat with your phone.
-
Follow the instructions on your phone.

Note: We would recommend registering the thermostat to the First Alert or Resideo app when using Apple HomeKit to better sync the time.
Using Your Thermostat
The screen will wake up by pressing the center area of the displayed temperature.

Setting the Time/Date
When the thermostat is linked to the home WiFi router and registered to an account using the First Alert or Resideo app, the date and time will update automatically.
If not using WiFi you can set the time/date as follows:
-
Touch Menu.
-
Scroll down and select Preferences.
-
Select Date and Time.
-
Date and time information are displayed.
Set Date
-
If the date shown is incorrect, touch Date.
-
Scroll up or down on the left of the display until the correct month is in the middle of screen.
-
Scroll up or down on the center of the display until the correct day is in the middle of screen.
-
Scroll up or down on the right of the display until the correct year is in the middle of screen.
-
Touch Done.
Set Time
-
If the time shown is incorrect, touch Time.
-
Scroll up or down on the left of the display until the current hour is in the middle of screen.
-
Scroll up or down on the center of the display until the current minutes are in the middle of screen.
-
Scroll up or down on the right of the display until the correct am or pm is in the middle of screen.
-
Touch Done.
Setting the Fan
NOTE: Fan setting not available for all system types.
-
Touch Menu.
-
Touch Fan.
-
Choose on, auto, or circulate.
-
Auto setting only runs the fan with the heating or cooling system.*
-
On setting runs the fan continuously.
-
Circ setting runs the fan approx 33% of the time to ensure air circulation.
* The fan may also run with the humidifier, dehumidifier, or ventilator depending on how the thermostat was configured.
Programming the Fan
You can set the fan to on, auto, or circ for each program when using time-based scheduling.
Setting the System Mode
-
Touch Menu.
-
Touch System Mode.
-
Touch desired option.
-
Heat: Controls only the heating system.
-
Cool: Controls only the cooling system.
-
Off: Heating/cooling systems are off.
-
Auto: Selects heating or cooling depending on the indoor temperature.
-
Em Heat (heat pumps with backup Heat): Runs emergency heat on a heat call. Compressor is locked out.
-
Touch Done to save and exit.
NOTE: The Auto and Em Heat system settings may not appear, depending on how your thermostat was set up.
Using Priority
Priority creates an average temperature in your home based on specific rooms. This allows you to prioritize comfort where you want it.


Selecting Sensors
The temperature reading displayed on the home screen is from the sensor or sensors that are being used for temperature control. You can change which sensors are being used for control by selecting menu-priority. From the home screen, touch the menu icon at the bottom of the display and select “Priority”.
Priority Screen
Selected Rooms
When set to “selected rooms” you may select one or more rooms to read the wireless indoor sensor information from.
When multiple sensors are selected, the temperature is averaged.
Active Rooms
When set to “Active rooms” the thermostat controls temperature based on the reading from the indoor sensors that detect motion.
Alerts and Notifications
- The red dot above the Menu icon indicates an active alert or notification. Touch the Menu icon to view active Alerts & Notifications.
- Touch Notifications to open this menu.
- Touch the alert message to see more information about the alert or notification.

When there is an active alert or notification, you must select the notification banner and acknowledge the message before you are allowed to access the menu icon.
IAQ Reminders
You can set up IAQ reminders in the thermostat to remind users when filters, pads, bulbs, etc. need cleaning or replacement. The available reminders vary based on the ISU settings. For example, if the thermostat is configured to control a flow through humidifier, it will have the humidifier pad reminder but not the humidifier tank reminder:
-
Air Filter 1
-
Air Filter 2
-
Electronic Air Cleaner Pre-Filter
-
Electronic Air Cleaner Post-Filter
-
Humidifier Tank/Water Filter
-
Humidifier Pad
-
Dehumidifier Filter
-
Ventilator Core
-
Ventilator Filter
-
UV Bulb 1
-
UV Bulb 2
Reminders that are displayed under preferences will change based on the IAQ equipment installed. Reminders for equipment that is already set up can be set using the steps below. Reminders for IAQ equipment that is not yet set up must be turned on from the installer setup.
NOTE: Air Filter, Humidifier Pad, Dehumidifier Filter, and Ventilator Filter are displayed under Preferences even if they have not been set up. Humidifier Pad is not displayed if a steam humidifier has been installed.
To access or adjust the reminder settings
-
Select the Menu icon.
-
Scroll down and select Preferences.
-
Select the reminder you want to set from the list (shown above).
-
Press 5or 6to set timer length. Ranges, increments and units will change based on the reminder.
-
Press Done to save the reminder.
-
Press Reset Timer when you have completed the recommended maintenance or you can extend the timer setting to turn off the alert and remind you later to do the recommended maintenance.
-
Repeat these steps for all reminders you want to set
NOTE: When set for run time days, the thermostat tracks the amount of time the fan has run and compares that time against the number of run time days selected. Fan run time is counted when there is a call for forced air heating, cooling, or fan.
Setting Preferences
Preference menu options let you select how the thermostat displays information or responds to certain situations.
To access the Preferences menu:
-
Touch Menu.
-
Scroll down and select Preferences.
-
Select an option and follow prompts:
Display
-
Temperature units (Fahrenheit or Celsius)
-
Language (English, French, or Spanish)
-
Screen color (optional colors shown)
-
Color behavior (Display color change to indicate Heat or Cool is running)
-
Idle Screen Style (Temperature or Analog Clock)
-
Backlight:
-
Active Backlight setting (50% to 100%)
-
Inactive Backlight setting (0% to 100%)
-
Inactive Night Backlight
-
Brightness 0% to 100%
-
Night start time
-
Night end time
-
Dark Idle theme (T10+ only. Display turns black during the Nighttime settings)
NOTE: The Night setting is different from the Scheduled sleep period
-
App change behavior (When a temperature change is made by the app, would you like the thermostats to light up the display? Yes or No)
-
Indoor display offsets (temperature and humidity)
-
Bold font (Would you like the Home and idle screens to use a bold font?) T10+ only
-
Clean screen (allows 30 seconds to clean the display without accidentally changing any settings)
Date and Time
-
Set date
-
Set time
-
Set to 12 or 24 hour clock
-
Set for Daylight Savings Time
Reminders (these vary based on ISU settings)
-
Air Filter 1
-
Air Filter 2
-
Electronic Air Cleaner Pre-Filter
-
Electronic Air Cleaner Post-Filter
-
Humidifier Tank/Water Filter
-
Humidifier Pad
-
Dehumidifier Filter
-
Ventilator Core
-
Ventilator Filter
-
UV Bulb 1
-
UV Bulb 2
Adaptive Recovery
-
On or Off
Fallback room (T10+ only)
-
Can select thermostat or sensor(s)
After any changes, touch Done to save your settings.
Screen Color
The T10+ with firmware version 03.03.08.02 or later allows you to select the screen color from 12 different choices. Select Menu > Preferences > Display > Screen Color.


Screen color options
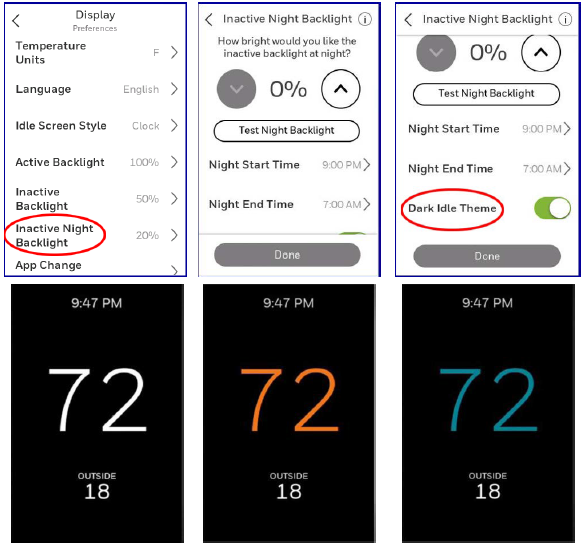
Inactive Night Backlight
There are two settings that can be used by customers who do not want the T10+ display to illuminate a dark room at night:
You can adjust the “Inactive Night Backlight Backlight” from 0% to 100%. At 0% the display is unlit and blank but wakes to 20% higher than that setting when someone touches the display.
If “Dark Idle Theme” is selected (T10+ models only), the display will show a black background. This is for customers who still want to read the display during the night setting time but don don’t want it to light up the room.
NOTE: When heat or cooling comes on, the display will still flood orange or blue. These colors are not as bright as the white idle screen but if the orange or blue is not desired, the customer can disable Dark Idle Theme and set the inactive backlight to 0%.
Fallback Room (T10+ only)
Under the preferences menu you can select which Room(s) are used if either:
-
The T10+ is set for active rooms and none of the sensors detect activity.
-
The selected sensors (active rooms or selected rooms) lose communication to T10+ (sensor failure, dead batteries, etc.)
If the fallback sensor(s) is also not communicating, the thermostat sensor will be used unless the installer had selected “NEVER USE THERMOSTAT”.
This operation differs between T10 and T10+. T10 always defaults to the thermostat in the situations above.
If you select “FALLBACK ROOM” then “OPTIONS”, you can select “NEVER USE THERMOSTAT”. This would be done if the thermostat was mounted in a utility room or other location that is not sensing the space temperature in an area it is controlling.